Showing posts with label Cosplay. Show all posts

Saturday, January 10, 2015

The Long Awaited Chuckie Finster Cosplay Tutorial!

Ladies and Gentlemen, BOYS AND GIRLS!!!!! It's finally here. The wait is now over!
The Chuckie Finster cosplay tutorial is COMPLETE!
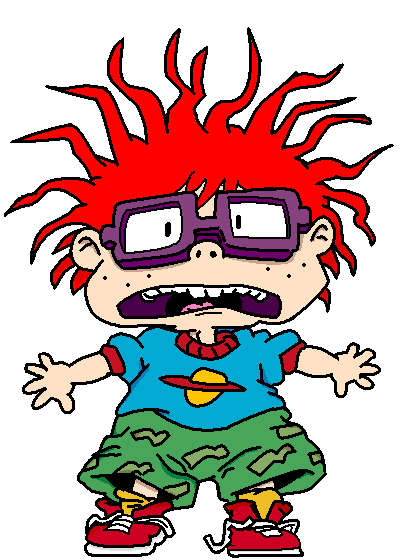


For this tutorial, you will need:


  • Blue T-shirt
  • T-shirt board
  • Paint Brushes
  • White, Black, Red, and Yellow fabric paint (acrylic paint works too)
  • Fine point Sharpie
  • Some large round object for tracing
  • Reference picture of Chuckie's shirt


READY?! LETS DO THIS!!


Step One:
Place your shirt on the T-Shirt board and pin the sides down so the shirt lies taunt against the board. This is super important, so when you're painting, the shirt doesn't move and make you mess up your lines.


Step Two:
Now, you need to draw Chuckie's iconic planet. Find something 5-6 inches in diameter that you can trace around. For me, I just used my dinner of instant noodles. When you trace, make sure you're using a FINE TIP Sharpie or pencil. The planet on Chuckie's shirt is kinda sloppy and looks like a kid drew it, so we're just using this as a basic outline, to help keep it even on all sides.


As for the ring around the planet, just free-hand it. Now, that might sound a little scary, but it's easier than it sounds. REMEMBER, it's suppose to look like a child's drawing, so if you're not the most artistic person in the world, IT'S OK! Just look at the reference picture as you draw it and you'll be fine!

Step Three:
YAY FOR PAINTING! Alright guys and gals, since we're painting on a dark shirt with light colors, we need to PRIME the space. I've painted PLENTY of shirts in my time to have learned this lesson the hard way. Basically, we just need to paint the whole planet white. It'll cover up your lines, but don't panic! These lines were just a guide. As the last step, we'll outline everything again with black, to give it that extra cartoony effect!


Step Four:
Once the entire planet is primed white, we can add color. I start with lightest colors first, mainly out of habit. This part is pretty self explanatory, just paint the two colors over the white. But remember! Between each layer of paint, you need to let the paint dry, and occasionally, GENTLY, lift the shirt from the board. (The paint seeps through the cloth and when it dries, the shirt will stick to the board. To prevent that, we need to gently separate the shirt from the board from time to time).


Step Five:
The last step is to outline the planet with black paint. DON'T WORRY about trying to have a steady hand! It's OK if it looks a little wonky and wobbly. IT'S A CARTOON, it doesn't need to look perfect!

Now from here, I think I might be done...but looking at Chuckie's picture, His shirt is trimmed with red on the collar and sleeves. It's up to you on how you'd like to accomplish this! I think I might just paint the trim.

But as of now, I'm happy with how it turned out! I've got time to figure out how I want to do the trim though. Our plans for the Con in February fell through, but Aaron and I are looking into A-Kon in June for my birthday! FINGERS CROSSED that works out, because I'd LOVE to wear this in the summer rather than winter :P


SORRY FOR THE MESSY DORM ROOM!! I decided to work on this rather than unpack. TOTALLY worth it! ;D

Well, I hope this tutorial was worth the wait! I'm really excited with how it turned out!! If you've got any comments or questions, don't be afraid to leave a note down below! 

Treat Yo' Self & Cosplay Update!

Hey guys! I'm so, so, so, SO, SOOOOOO sorry I feel off the face of the Earth again. Truth is, not a whole lot of fun and exciting things have been happening! I spent my entire winter break at home hanging out and relaxing with family. I also took an online class, so that pretty much took up all my free time.


BUT! It's a new year, a new semester, and a new, more blog devoted Kenzie! I promise I'll be updating a lot more in the future!!! A big thank you to the people that have still checked in on the daily to see if there's been new posts. You guys rock!

SO HERE'S THE UPDATES!

I just got back up to school and decided to have a TREAT YO' SELF day with my friend! (DISCLAIMER: Before splurging on the few things in this bag, I was a responsible adult and bought my textbooks for the semester and groceries. Because, as sad as it is, you can't live on expensive makeup.) We went out, had lunch, and went to Ulta. The wonderful makeup wonderland.
I LOVE ULTA. This has been a recent development. Normally, I just threw on some mascara for makeup and called it a day, but now, I LOVE doing my makeup. It has become a recent hobby. Mostly because of a Youtuber named Bunny, AKA Grav3yardgirl. Her videos are amusing, interesting, and informative! If you're just getting into makeup, or just want to get some advice on product, she's GREAT at actually giving in-depth reviews!! Check em out here! 

Anywho! The first thing I bought was more of a necessity rather than a treat yo self splurge, but it's new tweezers! 
Like a goober, I forgot to pack my awesome tweezers that I love so much...So, unless I want woolly mammoths for eyebrows, I NEEDED a pair of tweezers. The second thing I bought was kind of a splurge...
It's winter y'all. My lips have deeper cracks than the Grand Canyon. Now when I say I've tried everything to help moisturize my lips, I mean EVERYTHING. I just can't seem to find anything that would help. Perusing around Ulta, I remembered there was some blush by Too Faced that I wanted to look at, but ended up finding this instead. 
I am absolutely impressed with this lip balm! Normally, other lip balms tend to make my lips crack more and I have to consantly apply and reapply the balms. But not this! It's like one and done! 
 Seriously! This stuff is amazing! If you have dried cracked lips I definitely recommend this balm!


Too Faced "La Crème" Lip Balm - $22 


That was my splurge of the day! Not much, but it was a treat! 

The second treat was Taylor Swift's new album 1989. I was hoping to get the deluxe edition for Christmas, but no luck :/ I'm just glad to finally have a copy! Don't care who you are, love her or hate her, the girl has good and catchy songs :3


Another treat yo' self was from a far today. Since I'm back at school, I have to wait months to be able to visit my favorite comic book store back home :( BUT my amazing fiancé is back home and able to make runs for me! Today he ran over to our local store and picked up a newly released POP! figure that I've been wanting for a LONG time!! 


Isn't she CUTE!?!?!

Am I a lucky girl or what!? He fought through lunch time traffic and parked 5 stores down (because the comic book store was having a Magic the Gathering tournament today) JUST to get me this POP! Now THAT is true love :D Over the break, we also picked up Discord! HE'S HUGE!

Pretty soon, we'll have ALL the Pony POPs! These are some of my most favorite things to collect :3

My last stop of the day was to the bestest store of all...


That's right, I went to Hobby Lobby for exactly what you think. The Chuckie Finster cosplay I've been promising! 

Better late than never, right you guys??? Sorry it took so long, but as you're reading this, know that I'm working on it right now, and I'll have a tutorial posted by tomorrow!! It should be fairly simple and quick to throw together! I'll have step by step pictures to make up for the long wait. 


Saturday, November 15, 2014

Upcoming Cosplay!

Hey guys! Exciting news! My awesome fiancé is working on getting us tickets to Dallas Fan Days (put on by the same people as Comic Con)!!! I'm so excited because this will be my FIRST con EVER. Do you remember your first con? How excited were you?! I've been wanting to go to cons since I was young, but never had the money or time. So now that I'm finally getting to go, I wanted to make it special! (Fingers crossed) We'll be getting the golden passes, so we can jump the lines at meet and greets, get priority access to panels, and more! SO. EXCITE.

Now then, the question of cosplay comes to mind. What should I dress as?! I thought about it long and hard and I think I have the answer. One day will for sure be my Rocket Raccoon cosplay (You can find the two part tutorials here and here), but I had trouble thinking of what day two should be. I think I've got the answer. 

I'm still not very into wearing wigs at the moment. I'm just not very good at getting them to stay in place and I'm still learning what makes a GOOD wig. So when I think of cosplays, I try to think of what I can do that will incorporate my natural red hair color. SO, I decided to do a gender-bender Chuckie Finster from Rugrats! 


I'm really excited about this one! I started planning out materials I'd need to get, and it turns out I already have most of them!
 
Funky blue/green shorts? CHECK. Gold/yellow tall socks? CHECK. Big blocky glasses? Sorta check...my actual prescription glasses look like it, but they're black, not purple...I might look around and see if I can find some fake glasses that are purple, and just wear contacts. 
All I really need to get for this cosplay is some red high top converse (Which I'm due for a new pair of converse anyways) and a blue t-shirt that I'll paint just like his. 

SUPER EASY. I can't wait to get started on this cosplay! Hopefully it'll be soon (over Thanksgiving break). I'll be sure to post a tutorial of how I painted the shirt!

**Amendment** Totally forgot to tell you about the hair and makeup for this cosplay! So far the plan is to go with just a simple minimal makeup look. Just basic skin tone shadows and simple liner and mascara. MAYBE if I can't find some fake purple glasses, I could do a light pallet of purple eye shadows, just to still incorporate the color :D
As for hair, the crazier, the better! As you know, I've got natural fire red hair! But during the winter time, the color doesn't "glow" like it does in the summer sun. Every now and then I throw some all natural RED henna on it, just to enhance my natural color. It doesn't change it, just gives it a sort of boost. Whenever I have it done, it basically looks like I have my own personal ray of sunlight following me around everywhere I go. It makes my hair look KILLER. I use Lush's Caca Rouge, which usually runs about $25 for a block. You can find it here! Depending on how dark or light your hair is, the red color will vary. The end result is AMAZING and always leaves my hair super soft! As for styling it, right now, I've got the idea of a crazy mixture of crimping and small spiral curling. Chuckie has CRAZY hair. I don't want to just load my hair up with gel or mousse, so I think crimping is the best idea. But I'm still on the fence of what exactly I want to do. As soon as I can find my old crimper, I'll try to do a test run and let you guys know how it turns out! Like I said, I'll be starting on this cosplay during Thanksgiving break (starting November 24th), so be sure to check back!! 

And of course I'll be posting about anything and everything else nerdy/geeky/cosplay related! Tell me what you guys want to see/talk about! What was your first Con? What did you go as? Let me know in the comments!!! 

Wednesday, November 5, 2014

Rocket Raccoon Cosplay - Jumpsuit and Gun

Now that you've seen how I made Rocket's armor in the last post, here's all the other tid bits you need to know!

SO, this is the jumpsuit I ordered off of Amazon. The quality was GREAT, it just stretched out a little too much on the butt and boob area, so you could see my bra and undies...NOT CUTE. To remedy this, I found the perfect spanks to wear underneath it!
I got this at Walmart, and let me just say, it was money WELL spent. Not only did it 1) cover up the undies, and 2) keep me warm during our outdoor party, but it 3) made my figure look AMAZEBALLS. I have a feeling this thing will come in handy with future cosplays.

As for the ears and tail, I just went the simple route of buying a set from Spirit Halloween.

Of course, I didn't use the mask, I just did make up for the "raccoon eye" effect. This was the exact set I bought, but my ears didn't seem to be that pointy. All-in-all, it was another great purchase.

As for the black part on the jumpsuit, all I did was buy a plain black t-shirt about 3 sizes smaller than what I would normally wear, and cut it up. You want it super tight so it's not baggy anywhere. There's no exact pattern for how I cut the shirt, but I can tell you my process.

  • First, put on the shirt inside out.
  • Use a white crayon to trace three oblong horizontal "holes" on the torso, and trace the inside seam on the shoulder. 
    • Make sure you have at least 1.5 -2 inches between each "hole" because the fabric will sort of roll once it's cut. This will help keep it from completely rolling up on itself. 
  • Cut out the neck as close to the collar as possible!
  • Cut on the white crayon lines - AS STRAIGHT AS POSSIBLE - you won't be able to hide any jagged edges so try to be as neat as possible!
Here's how mine turned out!

Sorry for the messy counter...I'm kind of a mess. 
The length of the shirt was perfect! It covered my butt (which I'm kinda self conscious about) and hugged the jumpsuit nicely. 

Next up was the boots...
I already had a favorite pair of brown knee high boots that I wear all the time. To sort of give the effect of the brown/black fur Rocket has, I paired the brown boots with a pair of black knee high socks. (I know, BROWN AND BLACK CLASH!!! Get over it. It worked :P)

Now then...Time for the Gun:
This was actually the first thing I did for this cosplay. While I was planning and waiting for my jumpsuit to arrive, I decided it would be something good to take up my time. 

I was going to make Rocket's full sized blaster, but seeing as I was going to be wearing this cosplay to a Halloween party, I figured that his blaster would be a little cumbersome to carry around. While snooping around Walmart (yes, Walmart again...There's really nowhere to shop here in Stillwater) I found this awesome Nerf gun for like $15. I liked it because it was big and bulky. Almost like a mini version of Rocket's blaster. 


So, the steps are pretty self explanatory. I primed the whole gun white (except down the barrel, which was too hard to get to), and started with the darkest colors. From there, I added the metallic colors and details for age, wear, battle use, etc. This I actually took step-by-step pictures of! ENJOY!


It was hard to get good pictures of the close up detail, but I made the tip of the gun much darker than the rest. WHY you ask? In reference to my painting tips on the Rocket Armor post, I wanted to make the gun look like it was actually used, and burnt by "blaster fire". Because being Rocket, he LOVES to use his guns. 

Last but not least...
The Make Up!
For this, I had a basic idea of what I wanted to do, but I turned to Pinterest to see if I could find an actual picture to follow.
If anyone knows who this cosplayer is, I'd love to give her some credit!! AWESOME make up!
But alas, being in a small college town, you don't have access to really good make up. I mean, we have an Ulta, but being on a college student budget, I'd kinda rather eat than buy makeup. SO, again to Walmart I went. I bought some $1 white eyeliner by NYC (which was shockingly the ONLY white eyeliner I could find). Luckily, I remembered to bring up my Sephora box of goodies that has like 100 eye-shadows in it, and was able to concoct a fairly good formula for a smokey eye. Some black gel liner to outline the white, and I was ready to go!
PRO-TIP* - Not sure if you're aware, but I learned this from a friend who was a dancer. If you spray your face with hairspray after you've applied your makeup, it will seal it and keep it from running! Pretty cool huh?

Here's what my makeup ended up looking like!
My amazing hubby-to-be, Aaron, as Star Lord :3

Questions? Comments? Let me know! Email Kenzie!


Rocket Raccoon Cosplay - Armor

Alrighty guys and gals! This was my first "official" cosplay. I am ecstatic with how it turned out and I hope y'all feel the same!

The inspiration for this cosplay was of course the AMAZING comic and movie Guardians of the Galaxy. I always loved the comics and when I found out it was going to be a movie I was super stoked! My fiancé started it by saying he wanted to be Star Lord for Halloween. Now, some girls would automatically pick Gamora or Nebula to dress up as, because they're girls. But, me being me, I love to do something different and unexpected :3 So, after seeing the movie twice, I decided Rocket was the character most like myself, and THAT was who I needed to be.

Now then, since this is my first tutorial, if there's anything on here that I didn't explain very well, or you need some help with when you're trying it out yourself, just send me an email to the address at the bottom of my About Me page! :D


-A rough estimate of what you'll need- 
Construction paper - for pattern
Sharpie, pencil, etc.
Scissors - duh
Ruler or Yardstick
A big pack of regular thickness fun foam.
3-4 large sheets of 1/8th inch fun foam
Low temperature hot glue gun (with A LOT of glue)
Paint! (brown, black, white, maroon, silver - metallic, cobalt blue - metallic, dark bronze - metallic, gunmetal grey - metallic, and if you can find it, clear/white glow in the dark paint) 
Velcro sticker rounds

First off, like when I plan out any possible cosplay, I turned to Google. After searching and searching, no one seemed to have ANY type of tutorial I could use for pieces like Rocket's armor. THEN the clouds parted and the storms cleared when I found Commander Holly had made videos for every part of her Rocket cosplay. But, that's when the storm clouds rolled back in...though her videos are AWESOME and very thorough, there was NO WAY I could do that much heavy fabrication in my dorm room. And lord knows a college student's budget is stretched as it is, there was no way I could afford the equipment. So here's where the creative genes kick in. I looked on Pinterest,  mainly for reference pictures, and just HAPPENED to stumble upon the perfect picture of someone's foam fabricated Rocket armor.


--To be honest, I almost peed myself--
THIS is something I can work with!

My next step, was to make a sketch of the pattern. Since the picture I found was a guy's cosplay, I needed to slim down the back piece and make it a tad more feminine.


After the sketch comes the fun part. I made a pattern of each piece out of fun foam (AKA craft foam) occasionally just laying pieces on me to make sure they were the right size. I wish I could tell you exact measurements, but I kinda winged it. Just try to measure your back (or get a friend's help)

Sorry for the crappy-not-so-awesome picture. I just wanted to show the scale of the pattern.
The Foam:
So here's the dealio. I used two different types of fun foam. Just regular thin sheets and a few pieces of thicker/sturdier foam (I believe 1/8th inch thick is as thick as it gets).

On the pattern, I attempted to color code the pieces. Also! Make sure you leave quite a bit of overlap between each piece. That way, you'll have something to glue together. I left about 1-2 inches for each overlap.

Ok, so I kinda had to reassemble the pattern for this picture. It's missing the two bottom tail pieces (yellow shown above). I marked X's on the pieces I cut out of the 1/8th inch foam (including the two yellow tail pieces in the previous picture!) You'll also need a 1/8th inch thick sheet for the backing of the entire piece. Just so it's not so flimsy and flip floppy. 
As for the shoulder straps and hip straps (you're gonna hate me for this) but that was purely a happy accident. I can't remember how, but I "winged" the shoulder straps and as a result, the scraps turned into the hip straps. I know, CRAZY and kind of annoying that I can't give you an exact pattern, but if you look at some of the pictures in the Painted section, you'll be able to see what I mean and "wing" it too.

YAY CRAFTING!

Now then! Got your pieces cut out?! FANTASTIC! Now we can be like the Avengers and assemble! Hehehe. Get it? Assemble......MOVING ON...

Ok, first and foremost. You will NEED a low temperature hot glue gun. If you use a regular glue gun, it will pretty much melt right through your foam or melt it down to a not so pretty state. But if you like to live dangerously and have the foam to spare, by all means, have at it.
Gluing it all together is fairly simple. Just follow your pattern's assembly and you're sure to do it right! In the end, this is what mine looked like:

The white foam is all the thicker 1/8th inch foam and the tan is all the regular thin foam. I also glued the tail in place between two of the pieces because I knew I wouldn't be able to attach it anywhere else onto my jumpsuit.


The Paint:
This was my favorite part!! I love painting as it is, and I got to go crazy with this part! Me being me, I didn't take any progress pictures, but I feel you'll get the idea by seeing it complete.
The main things to keep in mind are:

  • Do the base colors first! If you're using colored foam, I suggest doing a white wash just so the colors you paint on will be true to the color.
  • When you distress it, make sure you're putting thought into how you're doing it. Think about it! the nooks and crannies should be corroded with dirt and grime. Rocket is a bounty hunter, he's probably been in a TON of fights and been thrown to the ground a few times. When you distress, make sure you scuff and darken places that would have hit and skidded across the ground if you were thrown across a room! Remember! It doesn't have to be even! Nothing ages or corrodes at an even rate perfectly symmetrical! 
  • It's not gonna be perfect the first go around. AND THAT'S OK! You just have to keep adding colors, messing around with tones, and light to see where the highlights and shadows hit. Painting will probably take the most time out of everything, so do it right and take your time!
  • Test out colors on scrap pieces of foam. You'll have PLENTY of scraps and that's perfect to test out different colors! Play with everything. If you see a color in the store that would look good, test it out! THERE ARE NO WRONG ANSWERS!
Use mine as an example, but distress it how YOU FEEL it should be distressed. Just remember the helpful hints and you'll do great!
On the circle in the center of the back, I used a cobalt blue and the glow in the dark paint. I WANTED to use blue LED lights, but I didn't have time :/ The glow in the dark paint worked fairly well! But it was nothing compared to an LED light. 
CONGRATULATIONS! THE HARD PART IS OVER! Well, kinda. It was the day before Halloween and I still needed something to hold the armor onto my jumpsuit. I thought about metal snaps, but after testing, I was afraid of the snaps tearing right through the fun foam. Then my mom suggested the simple idea of stick on Velcro. THANKS MOM! Seriously. These things. Like $2 at Walmart. I had to use about 1 and a half packages to keep the armor on, but it worked GREAT. All I did was stick on 3 dots on each arm and hip strap. The trick to making them line up right is put the two sides together first, then peel off one sticker and place it on the foam. After you stick all the pieces on the foam, get a friend to help hold it while you peel and stick the other dots into place on your jumpsuit. It's just that simple!


So, cool! That's how I made the armor for the Rocket Raccoon cosplay! I'll be writing another post about the jumpsuit and gun here soon! STAY TUNED!